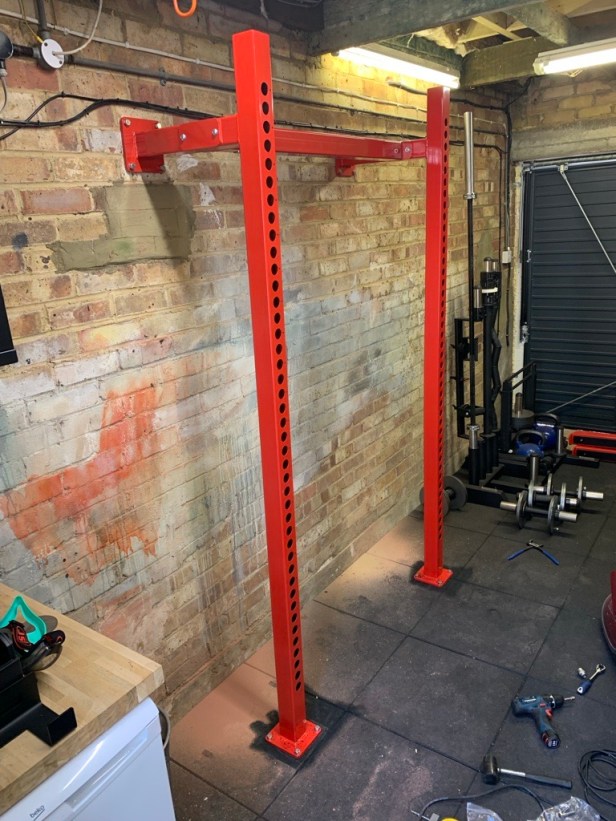
To save space in my single garage I bought a custom wall mounted half rack from Watson Gym, but I also needed it to be rock solid (confidence inspiring) when squatting 200KGs. The construction itself is overkill, it’s awesome, and I could have gotten away with just using wall screws, but going the extra mile and securing it to the ground gives me huge confidence it’s never going to budge.

Here’s what I used for the job
- MUST – Fischer DuoPower 14 x 70 rawlplugs
- MUST – M10 stainless steel coach screws (50mm and 120mm)
- MUST – 14mm SDS drill bit, or for a regular drill you can get this 14mm concrete drill bit
- MUST – Draper socket set
- MUST – Decent dust mask – you don’t want concrete or brick dust in your lungs
- SHOULD – M10 stainless steel penny washers (M10 x 20mm x 2mm)
- SHOULD – Bosch SDS Plus drill, but in hindsight a regular drill would have been fine
- SHOULD – 6mm masonry drill bit (for creating pilot holes)
- SHOULD – Bosch drill – used for doing up the sockets most of the way
- SHOULD – Draper 17mm drill socket bit
- SHOULD – Watson provided soft M10 plastic caps, and you can get something similar here (I ended up buying 30 from Watson for a small charge because their ones were more malleable / neater)


Here’s how I did it
Firstly, I have 40mm rubber mats on the ground, and the mount plate on the half rack was 8mm. So ~50mm of the coach screw was ‘used’ just going through the materials to get into the ground. I only needed an 80mm hole in the ground to secure the half rack.
I built the half rack first (it has a bolted cross brace) and then placed it along the wall where I’d be able to get good drill holes into brick and not mortar. I checked spacing for the Olympic bar and what it would be like adding weights to the bar – will I have enough space to put them on, but also for the bar to be used at any position up and down the half rack.
- Marked on the rubber mats where I wanted the ground holes to be
- Moved the half rack out of the way
- Sprayed some WD40 on the drill bit and drilled through the rubber mats and made a mark in the ground
- I then hoovered out the rubber and cleaned up the drill bit
- Pulled out the rubber mats and then drilled into the ground to 80mm (in a few cases the drill just went down under the concrete!)
- I then hoovered out the drill holes in the concrete and hammered in the DuoPower rawlplugs
- I then put the rubber mats back, moved the half rack into place, and using a drill with a socket attachment then tightened up a few of the 120mm bolts to secure the half rack into the ground
- I then marked the wall mounting plates and used a smaller drill bit to mark drill and mark where the holes were needed
- I then undid the ground screws and moved the half rack out of the way
- I then drilled the holes into the wall, hoovered, and then fitted the DuoPower rawlplugs
- I placed the half rack back, secure some of the screws into the ground (but allowed movement)
- I then screwed all of the wall screws in (again not all the way)
- I then secured all of the ground screws tight
- And then secured the wall screws
- I was then (somehow) surprised with just how sturdy it was. There’s literally no budge in the half rack
- Fitted the end caps to protect the bolts
- Hoovered up the brick dust and tidied it all up
And this is what it’s been like for the past year
Absolutely rock solid. No movement. Never once felt it wasn’t entirely secure. I can absolutely trust in the half rack.
I’ve also seen no damage to the bricks. The bolts aren’t tarnished, even though the garage gets cold and wet through the Winter.
About the Watson Gym half rack
If you want your own rack, then talk to them about customising one of these: https://watsongym.co.uk/product/wall-mounted-half-rack/.
I needed to remove the chin-up bars, I wanted exact placement of the wall and ground mounts, and I was specific with the height and width. Nothing was too much trouble, and it arrived exactly as needed. Price was good too for something so custom – about £1000 + VAT + Shipping.
At the same time I also ordered a set of matching lift off hooks: https://watsongym.co.uk/product/lift-off-hooks/ and a set of (colour matching again) safety beams that you can see on this Animal half rack: https://watsongym.co.uk/product/animal-half-rack/.
Colour is Watson Red.
Hope this helps.
